
According to the syllabus of this course, the second major part is Working With Data. We can categorize this part into two main categories:
As part of ASP.NET we will be dealing with the second category. To manipulate database the ADO.NET (one of the fascinating features of .NET framework) is our first choice. Database design is students' responsibility as it will help the student to exercise real application of database concepts. However, I have written a simple design of each system and you can use as an alternative.
Now we have four different projects one for each class:
I have tried to present you with the simplest design of each of these systems.
- Database Design and Implementation
- Prepare data model normally Entity relationship diagram
- Prepare database schema which states the physical structure of our database
- Create the database based on the schema by using any DBMS we want
- Database Manipulation
- Work with the database tables to insert, update, delete or retrieve data
As part of ASP.NET we will be dealing with the second category. To manipulate database the ADO.NET (one of the fascinating features of .NET framework) is our first choice. Database design is students' responsibility as it will help the student to exercise real application of database concepts. However, I have written a simple design of each system and you can use as an alternative.
Now we have four different projects one for each class:
- Hotel Room Reservation System
- University Registrar System
- Online Shopping System
- Airline Booking System
I have tried to present you with the simplest design of each of these systems.
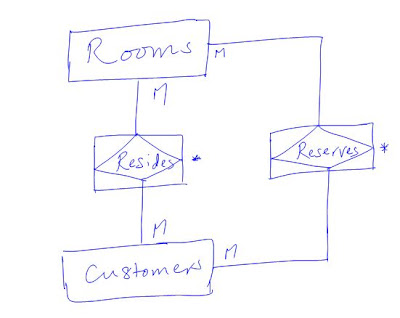
Hotel Reservation System
In hotel reservation system we will be dealing with these two main entities and two weak entities:

Customers (CustId, Title, FName, LName, DoB, Tel, Email, city, countryRes, Nationality, PassNo)
Rooms (RoomId, Type, Price, Floor, Facilities, Notes)
Bookings (BookingID, CustId, RoomId, DateMade, TimeMade, StartDate, EndDate paid)
RoomsCustomers (CustId, RoomId, StartDate, EndDate, RegistrationDate)
University Registrar System

**********
Database Implementation
You have a number of options and a number of DBMS softwares but for now we will be using SQL Server Express edition as our DBMS. When you installed your web developer sql server express was also installed but with no graphic interface to use. Web Developer supports many features that enables us interact with the SQL Server. I am going to show you how you can use web developer to create and test your database.
Take these steps:
In registrar system we will be dealing with these entities:
Student(StudId, FName, LName, DoB, Gender, DCode, DoB, PoB, PrevEducation, PrevInstitution, Program, ProgramType, City, Region, Tel, PoBox, Email, EmergencyContactName, EmergencyContactPhone, AppDate, Approved, ApprovalDate)
Department (DCode, DName, Major,Minor)
Employee (EmpId, FName, LName,DCode, Gender, Qualification, Position, Nationality, DoB, EmpType, EducLevel, HireDate, Tel, Email, PoBox)
Course (CourseNo, CourseName, CreditHour, AcadTermLevel,AcadYearLevel, DCode)
Term ( TermID,Term, AcadamicYear, StartDate, EndDate)
Note: for groups who are working on University Registrar System, tables used are more than the stated and that is left as a challenge for you. Study how your university's registrar system works and drive the rest of the tables.
Online Shopping System

Products (ProdId, ProdName, Description, SupplierName, Category, Quantity, UnitPrice, Picture)
Customers (CustId, FName, LName, City, State, PostalCode, Country, Phone, Email, CreditCardType, CreditCardNo)
Orders (OrderId, CustId, OrderDate, ShipDate, RequiredDate, ShipperName, Paid)
OrderItems (OrderId, ProdId, Price, Quantity, Discount, ShipDate, OrderItemsId)
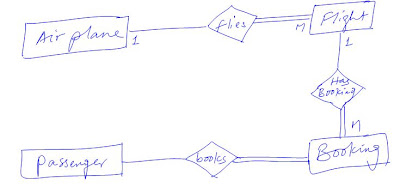
Airline Booking System
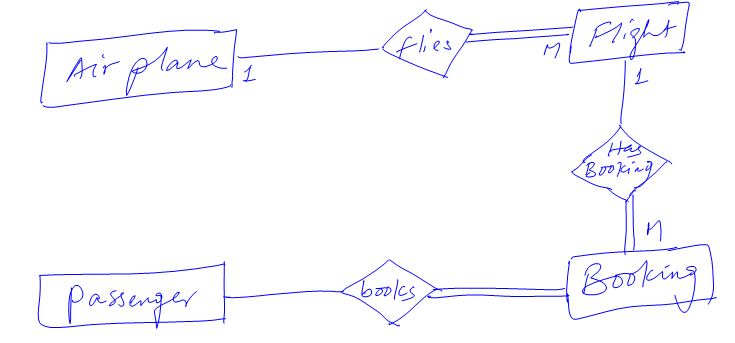
Passenger (Email, GivenName, SurName)
Airplane (RegNo, ModelNo, Capacity, Airline)
Flight( FlightNo, ModelNo, From, To, DepartTime, DepartDate, ArrivalTime, ArrivalDate)
Booking (Email, FlightNo, BookingDate, Status)
**********
Database Implementation
You have a number of options and a number of DBMS softwares but for now we will be using SQL Server Express edition as our DBMS. When you installed your web developer sql server express was also installed but with no graphic interface to use. Web Developer supports many features that enables us interact with the SQL Server. I am going to show you how you can use web developer to create and test your database.
Take these steps:
1. Website
> Add New Item > SQL Server Database > Add > Yes
2. View
> Database Explorer > Expand your database
3. R-click
on Tables folder > Add New Table
4. Define
fields for the table
5. Define
primary key constraint by R-clicking on the left side button before the column
(field) you want to make primary key > set primary key > Save
To see how you can do this and how you can create relationships between tables watch this video:
if you don't want this way go to my channel http://youtube.com/nuux14 and find the video by title


